|
Muzzle Blasts Online |
|
...for the muzzleloading enthusiast |
|
The muzzleblasts.com domain, subdomains, content, etc., are neither affiliated with the NMLRA nor its paper magazine Muzzle Blasts |
|
Muzzle Blasts Online |
|
|
|
|
|
|
Operating the Flintlock Rifle
As we age, we seem to forget that approximately every twenty years we get a new batch of people in our Association. This new batch is as eager for knowledge as we were and just as "green" as we were.
I'd like to pass on some of the more useful information that I've gathered over the years regarding the care, handling, and shooting of the flintlock rifle.
|
|
Figure A |
I would like to note here that the shooting sports have the safest record of any sport in the U.S. Let's keep it that way. You'll note that our ancestors established safe firearms handling procedures for their time, but some of these procedures aren't safe enough for us. Be historically correct whenever possible; be safe at all times.
Before we start, you should be aware of the dangers of not having a ball seated firmly on the powder. To have a sure way of knowing that the ball is fully seated, mark your ramrod. You will only have to do this once. Drop the ramrod down the bore when the rifle is empty and mark it at the muzzle. To mark the rod, lay a sharp pencil on the muzzle with the point against the ramrod and turn the rod so a thin black line "rings" the rod. Now load your rifle and mark the ramrod again in the same way at the muzzle. You now have two marks on your rod: one at charged and one at empty. With this you can tell at a glance if you are loaded or empty. If your ramrod mark shows loaded plus some, you may have double loaded, or the ball isn't fully down on the powder. This is a dangerous situation; correct it by removing the charge with a CO2 discharger or by seating the projectile properly.
Your ramrod is now marked. All well and good, but do you know how to use the rifle of your ancestors? We want the word use to include proper loading, care, and shooting. This article mainly covers long rifles.
Now the scenario starts. Let's cover loading first, and imagine that it's 1780, and you and your rifle are starting the day.
The rifle is to be unloaded to start with. Swab the bore really well and dry it of all oil or grease. To be historically correct you'll use a small worm or the groove in your ramrod and wrap with tow. Save the tow for future use. Your Grandpa didn't waste it; neither should you. If you have no tow, a dry, clean cloth patch will have to do.
You are now going to load the rifle, and to do so you will first put the cock and frizzen forward (the fired position) for safety. Now insert a small bird's feather through the touch hole and part-way across the breech plug face. The feather is inserted quill-end first. This creates an open channel to the interior of the main charge. Be careful here, and don't get a feather from a protected species! The small feathers of the wing are OK. Road kill is okay, or find a friend with a cat.
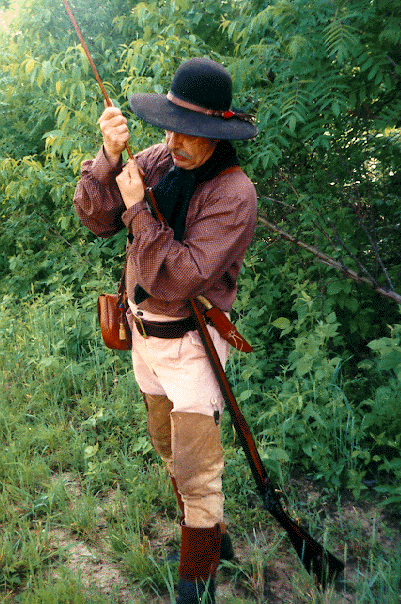
(See. Fig. A) Assume the proper loading stance as follows: grasp the rifle near the muzzle and swing the butt to the ground under your left arm, with the heel of the butt stock about a foot or two behind you. The rifle's heel will be toward your back. Grasp the forestock under your left arm between the elbow and armpit.
Depending on your height, the muzzle will be somewhere from your chin to your chest and the ramrod toward your shoulder. This position, you'll note, puts the muzzle pointing away from you at a ten- to fifteen-degree angle. It's very safe and the rifle is quite secure for the loading procedure. Firearms accidents were an occasional occurrence on the frontier (see "Colonial Firearms Accidents" by Alan Gutchess in the Jan. 1999 Muzzle Blasts - ed.), and our pioneer fathers taught their children this stance, just as we teach our children proper techniques and safe practices. [Editor's note: Here's another good way to hold your rifle secure for loading: Set the butt plate on the ground, heel to the rear; angle the barrel away from your body and grasp the firearm securely with your knees. This is comfortable, safe, and efficient, and it leaves both hands free for the loading process.]
You'll also note that by grasping the forestock with your left upper arm, both hands are free to load the rifle. Your measure should be on your bag strap and your powder horn accessible to your right hand. Pull the horn stopper with your teeth and pour out a measured charge. Don't forget to put the stopper back in the horn. Now pour the powder down the muzzle.
Hit the barrel with the heel of your right hand a few times. This will settle the powder and knock any grains off the rifling.
|
|
Figure B |
Now place a pre-greased patch across the muzzle, center it, and set a ball with the sprue up in the dimple, all centered of course. Push the ball and patch into the bore with your thumb, if possible; otherwise use a single, smart rap on your short starter. Grasp the ramrod near the muzzle end and push the patched ball down with a hand-over-hand choke hold. Use both hands. Do not grasp the ramrod "high" and pull it down or you'll break it sure as grass is green. Seat the ball onto the powder with a few pounds' pressure. Note that the mark on your ramrod aligns with muzzle. Always try to repeat the same amount of seating pressure. This will help with consistent shots. Patches were also cut at the muzzle with a patch knife when time allowed it, but the contents of many old hunting bags prove that pre-cut or pre-shaped patches were common. These old bags produced many square patches, which, by the way, are easy to center and shoot well. Pre-cut patches were also found in cased sets of dueling pistols.
Withdraw your ramrod and return it to the thimbles of your rifle. Now cradle the rifle in your left arm with your left hand gripping the wrist, thumb over the wrist, muzzle to the left and pointed in a safe direction, somewhat like Fig. C. This position presents the pan and frizzen area for your inspection and manipulation. (Note: if you are at a match, use a position that keeps that muzzle down range, or make sure you stand side ways.)
Now, set the cock at the first notch (half cock) and close the frizzen down over the feather, helping to hold it in the touch hole. Into the forest you go, looking warily for game or foe.
We should note here that spit patches were not used unless they were to be fired immediately, such as at a rifle match. A spit-patched ball will leave a rust ring in the bore if it remains in place a few hours.
Let us continue.
Priming: So far, you are loaded but not primed. You spot your game or target. Gently push your frizzen forward and pull the feather out of the touch hole. This will clear the touch hole and may pull a few grains of powder into the pan. Prime your pan, close the frizzen, set the cock at full, aim, and fire.

|
|
Figure C |
The touch hole feather could be kept in the wire loops or tube under the cheek piece. It could also be kept in the bag or the hat band.1
We will note here that the Long Hunter carried his rifle both primed and un-primed, according to circumstances. The atmosphere, both "weather-wise" and political, dictated this. An un-primed rifle is obviously the safest to carry.
The rifle was usually cleaned after the first shot, as our ancestors certainly knew about rust and corrosion - but, of course, not during a fire fight. We often read, "He fired so many times that his rifle became fouled and worthless."
When you load with the greased patch, you also push down with the ball some fouling and lube the barrel ahead of the ball. The Pennsylvania Dutch had a saying: "While the next one you load, the last one you clean;" very true.
Carrying a primed flintlock can be unsafe, and in damp or wet weather, very foolish, as it is a sure way to get a mis-fire. If it is wet out, carry the rifle with the muzzle slightly down. This allows any water to flow away from the pan. Also, you can use a Cow's Knee (a fitted leather lock cover) to help keep the lock area dry.
Spot your target first and then prime. A good hunter can do this with minimum movement; this tends to slow you down and give you time to think. In many accounts of the past, the officer of militia would say to the riflemen, "Gentlemen, look to your priming." This meant to assure that the firelocks were primed.
Muskets were usually kept empty up to the last moment, then primed first and loaded secondly - a very unsafe practice for us, but it worked for the military. We must remember here that soldiers were expendable and expected to obey; plus, the only powder soldiers carried was in cartridge form, thereby limiting their options for priming.
The Rifleman might keep his rifle loaded but not primed in a "camp-out" situation. It is true that men often "slept on their arms" with rifles alongside their body under their blanket or waterproofed cover, usually with the muzzle toward their feet.

|
|
Figure D |
In a frontier situation, rarely was the rifle fired from an exposed off-hand position. We all know that firing from a rest position is more accurate and exposes less of the body to enemy view (or a deer's view). We know this is true from many battle descriptions of firing "from behind trees and fallen logs.'' Because of this, I would like to see more "any position" or "rest position" matches. It would be more like the real thing. Could this be why chunk gun and cross-stick matches are so popular?
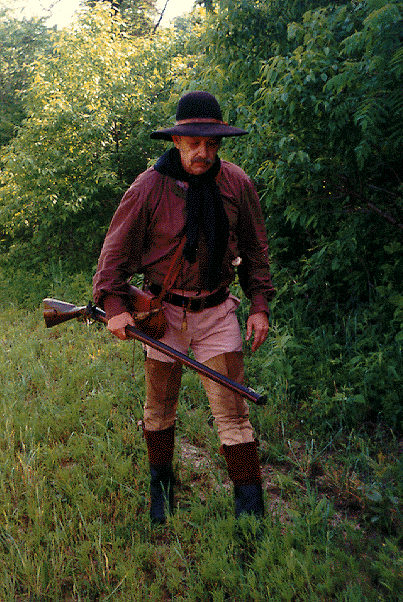
Carrying the rifle: The rifle was usually carried with the dominant hand, muzzle forward. This puts the wrist and forearm ahead of the lock, protecting it from getting accidentally cocked or discharged. (See Fig. B)
Besides the muzzle-forward-and-down carry, another position is the cradle position. (See Fig. C). The nice thing about the cradle position is that the fingers of the carrying hand support the trigger guard bow and the open hand covers the lock and pan and protects them, with the main weight of the rifle resting on and along the left forearm. This carry makes it harder to maneuver in heavy brush or saplings.
See Fig. D. The third position is the "port" position where the dominant hand is at the wrist and the supporting hand at the fore end with the lock facing outward and the rifle at an angle, muzzle up, across the front of the chest. This is a very comfortable position and quick to get to the ready position. There are more carries, of course, but these are the most common ones.
Patching material was linen, cotton, and buckskin, with linen being the most common and preferred. Linen is very tough of fiber and has a close, tight weave. Buckskin was used, but it wasn't of a consistent thickness. The frontiersman would have to scrape it to the proper thickness with a knife blade. Most modern shooters used bed-ticking cotton because of the high cost of linen. Linen tow was used as a cleaning medium and works quite well.
|
|
Figure E |
The common lubes for patches in 1780 were lard, sperm oil, neat's-foot oil, bear oil, and a combination of 1/3 beeswax and 2/3 sheep tallow. Almost any animal fat is okay, but avoid those with salt in them, such as bacon grease and beef fat.
To clean after that first shot, wrap a little tow around the worm or notch in your rod, apply a little saliva, and clean. Make sure you have a little tow across the end of your rod (or worm) and turn the rod with your fingers to clean the face of the breech plug. Dry well and either re-load or grease your bore, depending on your immediate purpose. Back in camp, clean again; soap and water work well, as does alcohol or just plain water.
Other little Tricks and Tools your ancestors used:
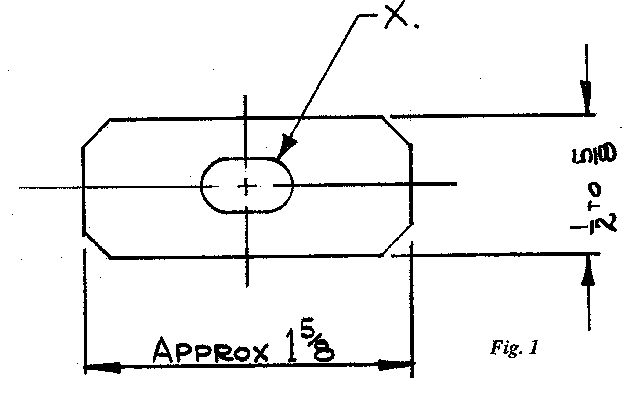
- Flatten a ball to a thickness of about 1/32 inch or less and trim with scissors to a long oval. Make it at
least twice as long as your flint; cut a notch out of its center and wrap it around the back of your flint. The
notch is to clear the top jaw screw. Mount this in the jaws of the cock and tighten well. We oftentimes use
leather for this, but lead grips well and imparts a sharper blow to the flint and therefore a better spark and
quicker, surer ignition. See Fig. 1.
- Keep the face of the frizzen smooth and free from gouges. It'll spark better.
- Drill a hole in the big end of your powder horn stopper and tie it with about a four-inch-long string to
the horn Schnabl. You won't be as likely to lose the stopper.
- Some shooters make up a stopper for the muzzle called a tompion that keeps snow or water out of the
barrel. Grease it well, and of course, remove it before you shoot!
- You gotta get that shot off - time's a-runnin' out. You've chipped your flint and still can't get enough
spark to fire the pan. Try this: tip the flint in the jaws a few degrees. This will present an angled blow to the
frizzen which might produce the sparks required (see fig. 2). Now, the shot went off - change that flint for
a new one.
- If the frizzen face gets rust on it, the quantity of sparks will be reduced. Keep this surface shiny bright
with a small piece of fine-grit emery. In an emergency, rub it with a little sand and your thumb.
- Keep the bottom of the frizzen clean where it covers the pan. This will keep powder residue out of your
face and help keep the priming powder dry.
- Black powder residue is hygroscopic (i.e., it collects water) and you don't want dampness near your
priming. So, wipe your pan clean and dry after each shot - also the underside of the frizzen.
- To help attain consistent accuracy, load the ball sprue up and center it exactly in the bore. Some
marksman even align the mold parting line on the ball with front sight.
- For a quick second or third shot, the frontiersman could use a loading block. A good loading block is
made of hardwood and may hold three or more greased pre-patched balls. If you make one, be sure you have
a depression that matches the outline of your rifle barrel with the ball hole centered in it. This depression
should be 1/8- to 3/16-inches deep. The fit to the barrel is preferred in that this centers the patched ball over
the precise center of the barrel. You should also provide a small short starter of ball diameter and put a small
flat handle on it. The length should be no more than the loading block thickness plus one inch. The starter
and block should be strung together. Keep this item in your bag.
- Ramrods were rarely spiral striped or stained dark, but in the old days they were quite often tempered to
add strength. To temper your rods, scrape and sand them to the proper size, length, and taper your rifle
requires. Get a piece of two- or three-inch plastic or steel pipe a few inches longer than your rod. Also get two
pipe caps and affix one to your pipe end and make sure it's water tight. Put your rods in the tube, keep it
upright and fill it with #1 fuel oil or kerosene. Keep the rods completely submerged and cap the tube. Now,
set it aside for nine months to a year. The rods will come out tough, hard, and flexible. It's very difficult to
snap one of these rods. My Great Grandpa Harmon Grove taught me this trick forty years ago when he was
96. He "tempered" his cleaning rods, hammer handles, axe handles, pick handles, and shovel handles.
Tempering your ramrods adds to safety, as a broken ramrod can easily pierce flesh. The best reason for the
tempered ramrod is the near elimination of field breakage. Be sure to use only straight-grained hickory with
no grain "run-out"; split wood is better than sawn.
Kerosene is a "modern" product, so if you want to temper your ramrod with a 1780 product, use 1/2 to 2/3 turpentine with the balance (1/2 to 1/3) of linseed oil. Soak for about a year. In either case, kerosene or linseed oil, keep the ramrod ends exposed to the liquid as 90% of the absorption of the "liquid" will be through the exposed ends via capillary action. It should be noted that some claim kerosene has a tendency to promote rot in wood. I have no idea how long this takes as I've never viewed it - five years, ten years, more? Enough said on tempering.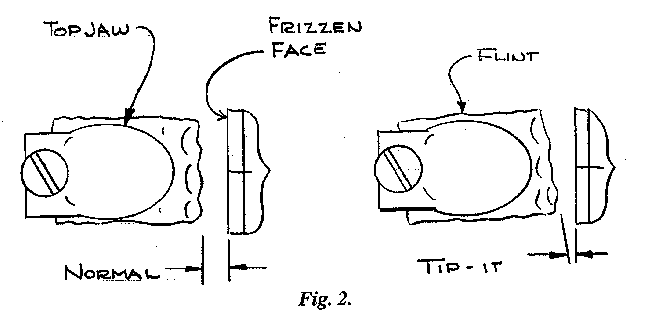
Figure A
- Patch Boxes: It's not hard to understand why the name is "patch box." Some patches for original rifles
have been found in the patch box. Most modern shooters prefer to keep patches in the bag. Patches have also
been found in original bags. Keep your hinge and catch well oiled. If you keep a patch worm in the patch box,
wrap it in a few patches so it doesn't rattle. Percussion shooters can keep a spare nipple in the patch box or
cap box. If you are a percussion shooter and want to keep your caps in the cap box, place a mat of cotton in
the bottom of the box. It makes the caps easier to get at and keeps them from rattling. About once a year, it's
a good idea to dump the contents of the cap or patch box out and clean it of the dirt and spider nests.
- The lock and set triggers should be removed on occasion and cleaned and re-oiled. Make sure you put your lock on half-cock before removing. Some mainsprings hang low in the "fired" position and can pull wood from the lock mortise. Clean well with an old tooth brush and oil the moving parts. Make sure all the screws are snug except the sear screw. Tighten this one too tight and the sear might not work. Clean the lock and trigger mortises in the stock with a brush before re-assembly. A good way to remove the lock is to put it on half-cock, back the lock screws almost all the way out, and then tap the screw heads, first one and then the other. The lock should come straight out of the mortise. Then remove the lock screws.
On a percussion gun, you may have to loosen the tang screw or remove the barrel as a tight barrel may put pressure on the lock in the drum area and prevent its removal.
I have trained myself and have been taught in many crafts over the years: leather, wood, blacksmithing, rifle building, and the like. I count myself fortunate that many others helped in my training. Many years ago, I was admiring a unique feature on a fellow builder's new-built rifle. I asked him how he did it. He looked at me and smugly tapped his temple with his finger, giving me the "that's for me to know" signal. As it turned out, I not only figured out how he did it, but I improved on his method. Out of this came a vow that I would never withhold any information and would ever be a teacher when asked.
To sum up: I've been privileged to know a great many men who could easily answer to the name Old Timer. I deeply cherish both their memories and what they taught me by word and deed. Some of this, along with my own discoveries, I have attempted, to entrust to you, especially you newcomers among us. I share this information in the hopes that there are many who feel the same way.
We all count on you to be safe in our sport, to be inquisitive and persistent in your research, and to be generous in sharing the knowledge you acquire during your lifetime.
Footnote
1 "Three iron staples underneath the cheek piece once held a touch hole feather," from: Rifles of Colonial America, Vol. I by George Shumway plate 38. Also see, Vol II plates. 111a&b, 118a & text, 121b, 135b and text, and 138b.
Bibliography
Rifles of Colonial America by George Shumway Vols. I and II. At least two dozen rifles with this feature are pictured in Rifles of Colonial America by George Shumway.